Without much humdrum, let me jump into the how-to part. But just before that a small note. When i mentioned disk image, I meant device image and not partition image.
There is a difference between disk image and partition image. Even if the file is something.img, you need to ensure that it is a disk and not a partition image. Disk image is where the partition reside. It is a container for partitions. In simple term device holds the partion within it just like chocholate box holds chocolate cubes in it. Thus depending upon the size/capacity of the box or device inner volume, you can hold partition or chocoloate of upto its maximum permitted size/volume and not beyond that. So please ensure you are actually resizing the disk, using the methods below, and then the partition. In the tutorial below resizing the partition is just a part of the entire process. If you just want to expand the device image, you can skip partition expanding process or if you to expand the partition only without or with a already large device, skip the device expanding part. My tutorial below uses basic Linux tools and syntaxes that will work in any version and flavour of Linux that support KVM or Xen based virtualization. I have not tried this with any other virtualization technology, but with little changes it should work for others too.
For the purpose of this tutorial, following are the specs and assumptions used as example.
Host OS : Installed, configured and running CentOS or RHEL 5.6 as OS with KVM or Xen as virtualization technology.
Guest VM OS : Installed, configured and running CentOS or RHEL 5.6 as OS.
VM Disk(Device) Image Name : 60GB.img
VM Disk(Device) Size : 60GB (maximum allowed size)
Root ( / ) partition : The / partition of this machine was assigned to the virtual disk of size 60GB. So it is utilizing the maximum allowed size of the device.
Resize requirement : around 100GB
RESIZE THE DISK(DEVICE)
1. Create new image of size 40GB for the disk(device). 40GB because we are going to expand the 60 GB to 100GB, so we need additional 40GB
qemu-img create -f raw 40GB.img 40G
2. Now create a new disk(device) image by concatenating 60GB.img + 40GB.img to a new file 100GB.img. Remember to concatenate 60GB.img first, with 40GB and not vise-versa.
cat 60GB.img 40GB.img > 100GB.img
The disk(device) is now resized to 100GB. Now attach 100GB.img as your new primary device(removing the old 60GB.img) in your VM configuration and boot your guest.
RESIZE(ONLINE) THE PARTITION
1. After the VM finishes booting, login to it and issue the following command.
df -h // See all mounted partition related information.

fdisk -l // See all available disk(device) related information.
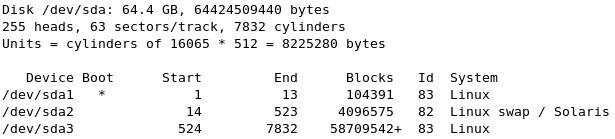
Note down the partition name and number, and device name from the above command. e.g. /dev/sda3 is the partion I want to expand, thus /dev/sda is the device.
2. Now we will do the actual resizing using fdisk. First we will ask fdisk to load and modify the device information into its cache. And then apply it into the disk by flushing its cache.
fdisk /dev/sda // Choose the device, to load information of, in its cache.
3. Then, ask fdisk to delete the partition information in its cache.
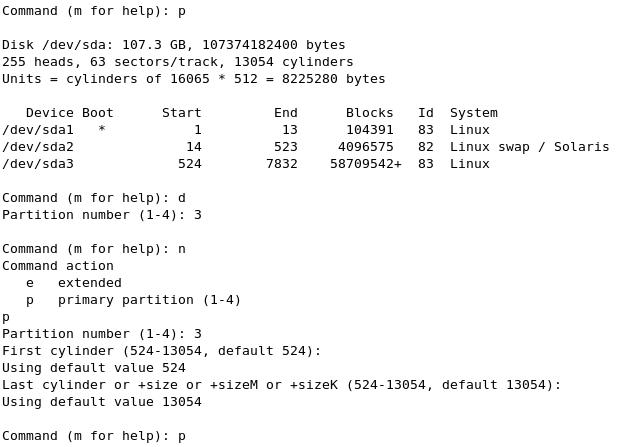
Command (m for help): p // Print partition information
Command (m for help): d // Delete partition
Partition number (1-4): 3 // Partition number to delete. It should be the partition that you want to expand.
above, 3 is the partion number of /dev/sda3 I want to expand. In case of a single partition it will be selected automatically by fdisk. Dont save the partion at this stage else you will lose data.
Then, ask fdisk to recreate the parition in fdisk cache.
Command (m for help): n // new partition
Command action
e extended
p primary partition (1-4)p // partition type is primary
Partition number (1-4): 3 // same partition number as given above.
keep pressing return, to select all default values for all other, including cylinder start and end to utilize the entire available capacity of the device. Otherwise give end value of cylinder after calculating the size using cylinder value. Google it for that with keyword "howto calculate disk size from cylinder value"
Now, review the changes made in fdisk's cache.
Command (m for help): p // print partition information to review the changes made in fdisk's cache.
Finally flush the changes from fdisk cache to disk.
Command (m for help): w // Flush the cache to disk parmanently.
See example image below for the entire step 3.
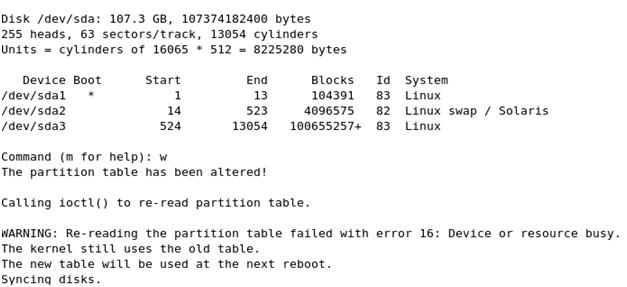
Ignore any error messages as above
4. Now reboot your VM once again. Then once the VM finishes booting, login to it.
5. Run the following commands
resize2fs /dev/sda3 // Online resizing of the partition /dev/hda1
6. Now reboot your VM for the last time. One the VM finishes booting, you have resized partion inside your resized disk(device). Resized disk(device) only in case you have resized that too, to make space for your new resized partition.
df -h

Isn't that simple?
Cheers!
Ani